Auditing datasources
Description
Sometimes when working with sensitive data we need to have a list of changes on a given record in order to track down when a given change was made. This example will demonstrate how this can be performed. We'll start from the builtinDS sample, to which we'll add an additional DataSource which will be audited and we'll change the user interface in order to display the list of changes in a second (newly added) grid each time a row is selected.
Please note that from version 4.1 / 9.1 and later, the DataSource auditing is a built-in feature. For more information, follow this link.
Creating the audited and the audit trail DataSources
- Go to war/ds/ and copy suppylItem.ds.xml to supplyItemAudited.ds.xml
- Go to war/ds/test_data and copy supplyItemLarge.data.xml to supplyItemAudited.large.xml
- Edit the newly created supplyItemAudited.ds.xml file and change the following attributes:
Attribute | New value |
|---|---|
ID | supplyItemAudited |
tableName | supplyItemAudited |
dbImportFileName | supplyItemAuditedLarge.data.xml |
(Small side note: although the sample has the absolute path for dbImportFileName, when importing the DataSource it is possible the import tool won't see the test data unless it has been correctly specified in the table)
For creating the audit trail DataSource (which will be used to save the changes made to the records) we will need to create a DataSource containing exactly the same fields as the audited DataSource, and in addition we will have to add some additional new fields (for saving the time when the record was made, and what kind of operation was done). Additionally we'll need a different primary key, as each initial row could be changed more than once, so itemID will not be declared as a primary key. This is how the newly created DataSource should look:
<DataSource
    ID="supplyItem_AuditTrail"
    serverType="sql"
	tableName="supplyItem_AuditTrail"
>
    <fields>
    	<field name="auditRowID"      type="sequence" hidden="true"       primaryKey="true"/>
        <field name="operationType"       type="enum"     title="Operation Type"       length="6">
            <valueMap>
                <value>add</value>
                <value>update</value>
                <value>remove</value>
                <value>fetch</value>
            </valueMap>
        </field>
        <field name="timestamp"   type="creatorTimestamp"  title="Timestamp" hidden="false"/>

        <field name="itemID"      type="integer" hidden="true"/>
        <field name="itemName"    type="text"     title="Item"        length="128"       required="true"/>
        <field name="SKU"         type="text"     title="SKU"         length="10"        required="true"/>
        <field name="description" type="text"     title="Description" length="2000"/>
        <field name="category"    type="text"     title="Category"    length="128"       required="true"
               foreignKey="supplyCategory.categoryName"/>
        <field name="units"       type="enum"     title="Units"       length="5">
            <valueMap>
                <value>Roll</value>
                <value>Ea</value>
                <value>Pkt</value>
                <value>Set</value>
                <value>Tube</value>
                <value>Pad</value>
                <value>Ream</value>
                <value>Tin</value>
                <value>Bag</value>
                <value>Ctn</value>
                <value>Box</value>
            </valueMap>
        </field>
        <field name="unitCost"    type="float"    title="Unit Cost"   required="true">
            <validators>
                <validator type="floatRange" min="0" errorMessage="Please enter a valid (positive) cost"/>
                <validator type="floatPrecision" precision="2" errorMessage="The maximum allowed precision is 2"/>
            </validators>
        </field>
        <field name="inStock"   type="boolean"  title="In Stock"/>
        <field name="nextShipment"  type="date" title="Next Shipment"/>
    </fields>

</DataSource>
Creating the database table and importing test data
We are now going to create a database table for this newly declared DataSource and import some test data into it. For this we will use the Admin Console. To start the Admin Console, launch the application and then navigate to http://127.0.0.1:8888/builtinds/tools/adminConsole.jsp. This will open the admin console in a new web page.
In the newly opened page, select the 'Import DataSources' tab and once visible, select the newly created 'supplyItemLong' DataSource. Please make sure you check that the 'Test Data' column is set to 'yes' before doing this. If it is set to 'No', then please check the file names you specified in the previous steps. Once selected, press the 'Import' button at the bottom of the page. (Leave both checkboxes checked to create test data and generate the table).
If successful, you will be notified by a popup window that the DataSource has been imported.
You can double-check if the import worked correctly by selecting the 'Database Configuration' tab, then select your database name and click the 'Browse' button. In the window that is then displayed, select your database and in the left bottom grid you should see the SUPPLYITEMAUDITED table. By clicking on it, you should see the imported test data in the grid on the right.
Adding the audited DataSource to the user interface
To add auditing to this project, locate the code in BuiltInDS.java that looks like this:
grid.setData(new ListGridRecord[]{
                new DSRecord("Animals", "animals"),
                new DSRecord("Office Supplies", "supplyItem"),
                new DSRecord("Employees", "employees")}
        );
and replace it with:
grid.setData(new ListGridRecord[]{
        		new DSRecord("Audited DataSource", "supplyItemAudited"),
                new DSRecord("Animals", "animals"),
                new DSRecord("Office Supplies", "supplyItem"),
                new DSRecord("Employees", "employees")}
        )
This newly added DataSource will need to be loaded. For this locate the BuiltinDS.html file in the war folder and open it for editing, then navigate to the Script tag that defines the Datasources. This is always prefixed with "DataSourceLoader?datasource=":
<script src="builtinds/sc/DataSourceLoader?dataSource=supplyItem,animals,employees"></script>
and add our newly created DataSource
<script src="builtinds/sc/DataSourceLoader?dataSource=supplyItem,supplyItemAudited,animals,employees"></script>
Making the datasource audited
Auditing works by adding a server object which will intercept all calls performs an additional request for saving the operation and the record to an audit trail database. So let's add the server object. For this, we need to add the following declaration to the supplyItemAudited.ds.xml:
<serverObject lookupStyle="new" className="com.smartgwt.sample.server.SupplyItemAuditedDMI"/>
then declare this DMI class as follows:
package com.smartgwt.sample.server;

import java.util.Date;

import com.isomorphic.datasource.DSRequest;
import com.isomorphic.datasource.DSResponse;
import com.isomorphic.log.Logger;

public class SupplyItemAuditedDMI
{

    Logger log = new Logger(SupplyItemAuditedDMI.class.getName());

    public DSResponse fetch(DSRequest dsRequest)
        throws Exception
    {

    	// if fetch need also to be audited, can be done here
        DSResponse dsResponse = dsRequest.execute();

        return dsResponse;
    }

    public DSResponse add(DSRequest dsRequest)
        throws Exception
    {
        log.info("procesing DMI add operation");

        // execute first the sql operation
        DSResponse dsResponse = dsRequest.execute();

        // save the new row
        saveAudit(dsResponse, "add");

        return dsResponse;
    }

    public DSResponse update(DSRequest dsRequest)
        throws Exception
    {
        log.info("procesing DMI update operation");

        // execute first the sql operation
        DSResponse dsResponse = dsRequest.execute();

        // save the new row
        saveAudit(dsResponse, "update");

        return dsResponse;
    }


    public DSResponse remove(DSRequest dsRequest)
        throws Exception
    {
    	log.info("procesing DMI remove operation");

    	// execute first the sql operation
        DSResponse dsResponse = dsRequest.execute();

        // save te new row
        saveAudit(dsResponse, "remove");

        return dsResponse;
    }

    /**
     * Save a response and a operation to the audit trail datasource
     *
     * @param response the response to be saved
     * @param operation the operation made to get this record
     *
     * @return the response of saving the record to audit trail database. If user wants to
     * check the response from the server, he can check on the response returned by this
     * method
     *
     * @throws Exception
     */
    private DSResponse saveAudit(DSResponse response, String operation)
    		throws Exception
    {
    	DSRequest auditRequest = new DSRequest();
        auditRequest.setDataSourceName("supplyItem_AuditTrail");
        auditRequest.setValues(response.getRecord());
        auditRequest.setOperationType("add");

        auditRequest.setFieldValue("operationType", operation);
        auditRequest.setFieldValue("timestamp", new Date());

        return auditRequest.execute();
    }
}
You will notice we've defined methods for all the operations we want to audit and for each of them we save the record in the audit trail database.
Adding an audit trail DataSource to the user interface
Once the auditing mechanism is setup, all we need to do is add a grid displaying the audit information for the selected records.
we need to add an additional list grid to show the audited records. Find the declaration of boundList at the beginning of the file and add declaration for the new listgrid as follows:
ListGrid auditList;
Now, we need to add this grid to the layout. For this search the line where the initial list grid is added to the layout:
vStack.addMember(boundList);
and the following code directly after it:
	auditList = new ListGrid();
        auditList.setHeight(200);
        auditList.setCanEdit(false);
        auditList.setShowFilterEditor(true);
        auditList.setSelectionType(SelectionStyle.SINGLE);
We now need to set the datasoure for this new list to the supplyItem_AuditTrail, so in the bindComponents() method, add the following code:
        auditList.setDataSource(DataSource.get("supplyItem_AuditTrail"));
        auditList.sort("timestamp", SortDirection.DESCENDING);
(Notice we're sorting the grid by timestamp, in descending order, which will display the latest changes first).
Each time we click in the initial grid on a row, we'll fetch the audit data and display it in the audit grid. For this, change the click handler of boundList from:
boundList.addRecordClickHandler(new RecordClickHandler() {
            public void onRecordClick(RecordClickEvent event) {
                Record record = event.getRecord();
                boundForm.editRecord(record);
                saveBtn.enable();
                boundViewer.viewSelectedData(boundList);
            }
        });
to:
 	boundList.addRecordClickHandler(new RecordClickHandler() {
            public void onRecordClick(RecordClickEvent event) {
                Record record = event.getRecord();
                boundForm.editRecord(record);
                saveBtn.enable();
                boundViewer.viewSelectedData(boundList);

                auditList.fetchData(new Criteria("itemID", record.getAttributeAsString("itemID")));
            }
        });
Finally, we need to load the audit trail DataSource. For this edit BuiltInDS.html and add supplyItem_AuditedTrail to the list of loaded datasources:
<script src="builtinds/sc/DataSourceLoader?dataSource=supplyItem,supplyItemAudited,supplyItem_AuditTrail, animals,employees"></script>
And that's it. As soon as you change a record and save it, you'll notice that once you select that row again in the grid, the second grid will display the list of changes made, in descending order, with latest change first.
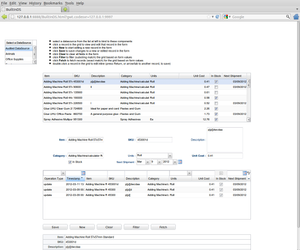
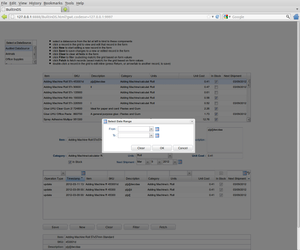
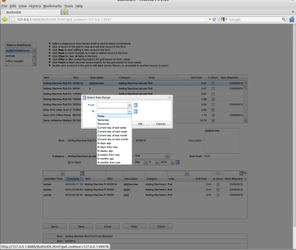
Also, note that you can filtering in the second row and by clicking calendar icon next to the timestamp field, you can filter to a specific time date range:
|
|
An Eclipse project can be downloaded from here: builtinds-Audit.zip
After importing it, you will still need to create and import the test data and DataSources in order to successfully run the sample.