Description
SmartGWT already has a real-time streaming technology we call SmartGWT Messaging, but there are other frameworks/technologies that you can use to achieve the same goal. One of such frameworks is the Atmosphere real-time streaming framework: https://github.com/Atmosphere/atmosphere
We have taken the Atmosphere real-time streaming framework to demonstrate ow to integrate it with a SmartGWT grid. For that, we have made a version that uses Atmosphere of the sample code that can be found here: http://www.smartclient.com/smartgwtee/showcase/#messaging_stock_quotes
The sample application has been deployed and tested on glassfish 3.1.2, with Google Plugin for Eclipse, and also has been tested as standalone running codeserver from command line via Maven.
Setting up
Setting up libraries
As we are using maven for this project, there is only a few values to setup. We rely on Maven plugin to download the required version of the smartgwt libraries. In order to install the smartgwt libraries in your local maven repository, execute the maven goal “isc:install”, from command line or from eclipse, before you compile and run the project for the first time.
$ mvn isc:install |
You need to execute that goal each time you need to link your project to a different version of SmartGWT.
To change to a specific version of SGWT you must redefine these properties in the provided pom.xml:
smartgwt.version | The smartgwt version (included p|d suffix). |
smartgwt.date | Smartgwt build date, in “yyyy-mm-dd” format. |
smartgwt.build | Smartgwt build number, in “X.Y-(p|d)yyyymmdd” format. |
You can start codeserver, in order to test the application in SuperDev Mode, from command line:
$ mvn package gwt:run |
Setting up project structure
When you uncompress the contents of the provided zip, you will find the following folder structure, that follows the proposed structure for a maven web project:
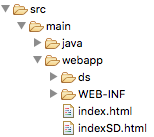
The java folder contains the required java source code, both server (jersey resource, servlet), client (the SmartGWT application) and the new API that provides access from GWT to the atmosphere javascript API.
The webapp/ds directory contains the demo data needed to initialize the application. It was copied from the original SmartGWT demo application.
The webapp/WEB-INF folder contains the deployment descriptor web.xml, described later in this document.
The webapp folder contains two html landing pages: besides the standard index.html we provide indexSD.html, a version that explicitly includes the code to load the smartclient js modules as required by the Super Dev mode, so navigate to this page instead of the standard index.html when testing from eclipse or from the codeserver.
You can compile the project inside eclipse with the provided pom.xml file, or call directly mvn from command line, invoking the “package” phase. If you are using eclipse with Google Plugin for Eclipse and M2Eclipse, import the project into eclipse as “Maven > Existing Maven Projects”. Once imported, open “Project > Properties”, under the “Google” pane check the option “This project has a WAR directory” inside “Web Application” and “Use GWT” under “Web Toolkit”. Do not forget to add the GWT library to the Java Build Path. M2Eclipse will maintain the eclipse build path always synchronized.
The atmosphere GWT API (wrapper)
Atmosphere 2.4 provides a wrapper around the jQuery.atmosphere.js library that allows GWT 2.0 applications to access the library. But, unfortunately, it is only provided as binary, and as it has been compiled against GWT version 2.6, it cannot be used with GWT>2.6. So, we have implemented our own wrapper class, providing a simple set of wrapper methods to access the javascript library. The source code for this wrapper is provided as part of this sample.
The wrapper is coded into a separate GWT module (isoatmos), under the com.isomorphic.atmosphere package. That way it can be packaged and used in different projects.
The API
The API provides these two methods:
JavaScriptObject subscribe(Configurator) | This method is used from the client to subscribe to server events. A Configurator is a java object used to configure the subscription, that also allows to register callback methods, as described below. The subscribe() method returns a Javascript object, the socket, that can be used to push data to server at any moment. |
void pushData(JavaScriptObject socket, JSONObject data) | This method allows to send data to the server from our GWT application at any moment. The socket object is the one that we obtained when we subscribed to the channel with the subscribe() method. The data field is a JSON Object, it may contain whatever we want to send to the server encapsulated as a json object. |
void unsubscribe() | Stop receiving messages from Atmosphere. |
The Configurator class provides these methods:
setService() | The identifier of the service set when we configured the AtmosphereServlet. By default, we set it to “jersey/rpc”, and can be changed in web.xml deployment descriptor. |
setChannelId() | The identifier of the channel to use. Can be a generic identifier, of we want to be notified of all messages sent by the server, or a specific one, so we will only receive messages addressed to us. |
setTransport() | Transport protocol. We use streaming by default. |
setFallbackTransport() | In case the selected transport protocol is not available in both sides (client and server), the framework will negotiate to find the next common protocol. This is our preferred protocol in case the first one is not available. By default is long-polling. |
setMessageHandler(IAtmosphereMessageHandler handler) | IAtmosphereMessageHandler is an interface that all MessageHandlers must implement. The interface only has one method, onMessage(JavaScriptObject response). Once the handler is registered, the method will be invoked each time a new message arrives to the client. |
The IAtmosphereMessageHandler interface only provides one method:
void onMessage(String response) | This is a callback method, that is invoked by the framework when a new message is received on our GWT 2.0 application from the server. … JSONObject jsonResponse = (JSONObject) JSONParser.parseLenient(response); JSONArray jsonStockData = (JSONArray)jsonResponse.get("stockData"); … |
Using the API
The first step is to subscribe the application to receive events from the server. For that, we must use a Configurator object.
The channelId can be an empty or constant String. All clients with the same channelId will receive the same broadcasted messages. If we want to receive server events addressed to our client, we must provide a unique channelId.
Together with the channelId, we setup the transport methods, and also provide a class implementing the AtmosphereMessageHandler interface. The class just implements one method, onMessage(), that is going to be called by the framework each time a server event is received.
... // Start listening remote events |
This is an example of an AtmosphereMessageHandler class:
… @Override } } |
The Jersey resource
This is part of the server side of the application, and in our application will be used only to register the subscription of a new client. We only need to define one method here, the one to accept the subscription (with the @GET annotation, as the atmosphere “socket.subscribe()” method sends a GET request).
public class JerseyRpc { |
In order to respond ONLY to the clients that subscribed to this channel, when a client subscribes to the jersey resource, the client generates a channel identifier for this client. This identifier arrives as part of the path used to locate the jersey resource during the registration. So we must configure our Jersey resource this way:
@Path("/rpc/{channelid}") |
Changes in the application
The GWT EntryPoint class that we are using is basically the same that you can find here. The main changes that we had to do to the application follows.
First, we have included the code to subscribe the application to the atmosphere channel that we defined in our jersey resource. In this example we are adding a value to the channelId, the startParameter, based on current time.
public void onModuleLoad() { … final long startParameter = System.currentTimeMillis(); … final String channelId = "channel." + startParameter; Configurator configurator = new Configurator(); configurator.setService("jersey/rpc"); configurator.setChannelId(channelId); configurator.setTransport(Configurator.TRANSPORT_STREAMING); configurator.setFallbackTransport(Configurator.TRANSPORT_LONG_POLLING); configurator.setMessageHandler(new MyMessageHandler()); // Start listening remote events AtmosphereWrapper.subscribe(configurator); … } |
The IAtmosphereMessageHandler implemetation provided, AtmosphereMessageHandler, just calls the original updateStockQuotes() method.
public class AtmosphereMessageHandler implements IAtmosphereMessageHandler { protected AtmosphereMessageHandler() { } @Override public final void onMessage(String response) { AtmosphereSample.updateStockQuotes(response); } } |
The second change was applied to the servlet that processes the request to start sending back data, the StockQuotesServlet, to replace the calls to the SmartGWT Messaging service with calls to atmosphere service. First we need to retrieve the atmosphere channel that we want to communicate to, based on the startParameter:
public void processRequest(HttpServletRequest request, HttpServletResponse response) throws ServletException, IOException { … ServletContext servletContext = ServletContextFactory.getDefault().getServletContext(); } |
Then, after we have created the data block to be sent to the client as we did before, we broadcast an atmosphere message to this channel.
public void processRequest(HttpServletRequest request, HttpServletResponse response) throws ServletException, IOException { … JsonResponse response = new JsonResponse(stockData); channel.broadcast(response); … } |
To encapsulate the data we created a class, JsonResponse, that just holds the stockData (We have added the @XmlRootElement annotation to assure that both json and XML can be generated, but it is not mandatory):
… @XmlRootElement public class JsonResponse { public List<Object[]> stockData; public JsonResponse() {} public JsonResponse(List<Object[]> stockData) { this.stockData = stockData; } } |
The third change we have done in the legacy application is in the method that receives the updates from the server, updateStockQuotes(). The main change we made there was to adapt the format of the received data to the required format, because, as we are receiving raw json data, we have to do some transformation.
public static void updateStockQuotes(String responseBody) { JavaScriptObject jsoResponseBody = JSON.decode(responseBody); Map<?,?> rp = (Map<?,?>) JSOHelper.convertToJava(jsoResponseBody); List<List<?>> stockData = (List<List<?>>) rp.get("stockData"); … } |
Other configuration issues
We need to take into account one configuration file: web.xml, where we need to configure the jersey resource. Also, we have had to configure the StockQuotesServlet.
<?xml version="1.0" encoding="UTF-8"?> <web-app …> <servlet> <description>AtmosphereServlet</description> <servlet-name>AtmosphereServlet</servlet-name> <servlet-class>org.atmosphere.cpr.AtmosphereServlet</servlet-class> <init-param> <param-name>com.sun.jersey.config.property.packages</param-name> <param-value>com.isomorphic.examples.atmosphere.server, org.codehaus.jackson.jaxrs</param-value> </init-param> <init-param> <param-name>org.atmosphere.websocket.messageContentType</param-name> <param-value>application/json</param-value> </init-param> </servlet> <servlet> <servlet-name>StockQuotesServlet</servlet-name> <servlet-class>com.isomorphic.isoatmosjersey.server.StockQuotesServlet</servlet-class> </servlet> <servlet-mapping> <servlet-name>AtmosphereServlet</servlet-name> <url-pattern>/jersey/*</url-pattern> </servlet-mapping> <servlet-mapping> <servlet-name>StockQuotesServlet</servlet-name> <url-pattern>/examples/StockQuotes/generate</url-pattern> </servlet-mapping> </web-app> |
Testing
To test the application, package and deploy it to your preferred application server. In case you want to test it with glassfish, you only need to execute the ant build.xml file provided, or manually “gwt compile” the project, then zip the “war” folder into a war file, for instance isoatmosjersey.war. Once you have the .war file, deploy it into glassfish as usual, then visit the application’s url, for instance http://localhost:8080/isoatmosjersey/
You should see a screen like this, with stock quotes changing dynamically:

In case you want to test it from command line, using codeserver, you can just execute this from the uncompressed folder:
$ mvn package gwt:run |
Once the codeserver application opens, you can navigate to http://127.0.0.1:8888/indexSD.html
You can find the described project in this zip: SGWT_Atmosphere_2.4.zip