| Table of Contents | ||
|---|---|---|
|
Description
There are various situations when editing data takes can take a significant amount of time. In case of those cases where many people are working on the same dataset, is not unusual that one or more of them will end up editing to find circumstances where multiple people are working on the same data, each of them being completely unaware of the fact that maybe is that they could potentially be overwriting data other people have just saved. In order to overcome this, we can use the DataSource's functionalities there is standard DataSource functionality to detect when this concurrent save saves appears, in order to to notify the user that the record he edited was already they are editing has already been changed by someone else, allowing him . This still allows the user to overwrite the record with his their own changes, continue editing or revert cancel the changes he made. Let's see how this can be done. they have made.
To keep it simple and small, we will start from use the builtinDS sample, to which we'll . To this we will add an additional DataSource which will be checking check for concurrent editing and we'll save. We will then add the required code to allow the user to make decisions about what should be done with the data.
Description
There are various situations when editing data takes time. In case of many people working on the same dataset, is not unusual that one or more of them will end up editing the same data, each of them being unaware of the fact that maybe is overwriting data other people just saved. In order to overcome this, we can use the DataSource's functionalities to detect when this concurrent save appears, in order to notify the user that the record he edited was already changed by someone else, allowing him to overwrite the record with his own changes, continue editing or revert the changes he made. Let's see how this can be done.
To keep it simple and small, we will start from the builtinDS sample, to which we'll add an additional DataSource which will be checking for concurrent save and we'll add the required code to allow user to make decisions about what should be done with the data.
The following part of the document assumes you have already successfully imported the sample in Eclipse and you can run it without errors. Please refer to the README file in the builtinDS sample project for steps to import it.
Creating the new DataSource and the required test data
- locate the war/ds/ folder in the project explorer and copy supplyItem.ds.xml to a new file called supplyItemLong.ds.xml
- locate the war/ds/test_data/ folder in the project explorer and copy supplyItemLarge.data.xml to supplyItemLong.data.xml
- locate the war/ds/test_data/ folder in the project explorer and copy supplyItemLarge.data.xml to supplyItemLargeLong.data.xml
- open supplyItemLong.ds.xml for editing and change the following attributes to reflect the id of the newly created datasource and the new data to be imported:
Attribute name | Value |
|---|---|
ID | supplyItemLong |
tableName | supplyItemLong |
dbImportFileName | supplyItemLargeLong.data.xml |
(Small side note: although the sample has absolute path for dbImportFileName, seems like for me when importing the DataSource, the import tool won't see the test data unless it has specified as in the table)
Creating the database table and importing test data
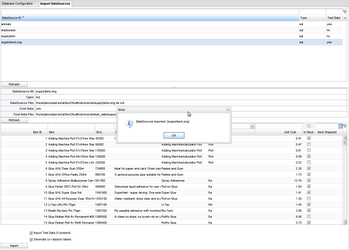
We are going to create a database table for this newly declared DataSource and import some test data into it. For this we'll have to go to the Admin Console. For this, launch the application and then navigate to http://127.0.0.1:8888/builtinds/tools/adminConsole.jsp link.
In the opened web page, go to 'Import DataSources' tab and there select 'supplyItemLong' DataSource. Verify to have in the 'Test Data' column 'yes'. If it is 'no' then check the file names in the previous steps. Once selected, locate the 'Import' button on bottom of the page and click it. (Leave checked both checkboxes to create test data and generate the table).
If all goes well, you will be notified by a popup window that DataSource was imported. Dismiss the window.
You can double-check if all went well by selecting the 'Database Configuration' tab, from there select your database name and then click onto 'Browse' button. In the newly displayed window select your database and on the left bottom grid you should have SUPPLYITEMLONG table. By clicking onto it, you should see the imported test data in the grid on the right.
Modifying the sample for detecting concurent editing
First, we need to make the code use the newly defined DataSource. For this locate the BuiltinDS.html file in the war folder and open it for editing. Locate inside the file the lines loading the DataSources:
| Code Block |
|---|
<script src="builtinds/sc/DataSourceLoader?dataSource=supplyItem,animals,employees"></script>
|
and change it to also load our new DataSource:
| Code Block |
|---|
<script src="builtinds/sc/DataSourceLoader?dataSource=supplyItem,supplyItemLong,animals,employees"></script>
|
Next, we'll have to wire in the new DataSource in the user interface, to allow users to interact with. For this, edit the BuiltInDS.java file in the com.smartgwt.sample.client package and locate the following code sequence, which sets the records for the listgrid showing the available DataSources:
| Code Block |
|---|
grid.setData(new ListGridRecord[]{
                new DSRecord("Animals", "animals"),
                new DSRecord("Office Supplies", "supplyItem"),
                new DSRecord("Employees", "employees")}
); |
and change it to following (a new line was added with Long Running Edit datasource)
| Code Block |
|---|
grid.setData(new ListGridRecord[]{
                new DSRecord("Animals", "animals"),
                new DSRecord("Long Running Edit", "supplyItemLong"),
                new DSRecord("Office Supplies", "supplyItem"),
                new DSRecord("Employees", "employees")}
); |
Rebuild the application and start it. At this moment you should have a new DataSource named Long Running Edit which can be selected, and when selected, the data will appear in the grid. It will be the same data as the one for Office Supplies.
Time to work on detecting concurrent changes. For this we will use a nice feature of DSRequest: on each update, DSRequest besides to the newly changed data also contain the old data which was changed. In order to detect concurrent changes, we'll fetch the record just about to be updated from the database and we'll compare it against the old data received in DSRequest. If they don't match somebody changed the record we were editing, so we'll abort the update process and return back the latest record found in the database together with an arbitrary error code (-74).
So, first let's subclass SQLDataSource by creating LongDataSource in the com.smartgwt.sample.server package:
...
The following part of the document assumes you have already successfully imported the sample into Eclipse and can run it without errors. Please refer to the README file in the builtinDS sample project for the required steps to import it.
Creating the new DataSource and the required test data
- Locate the war/ds/ folder in the Eclipse project explorer and copy the supplyItem.ds.xml to a new file called supplyItemLong.ds.xml
- Locate the war/ds/test_data/ folder in the Eclipse project explorer and copy supplyItemLarge.data.xml to supplyItemLong.data.xml
- Locate the war/ds/test_data/ folder in the Eclipse project explorer and copy supplyItemLarge.data.xml to supplyItemLargeLong.data.xml
- Open supplyItemLong.ds.xml for editing and change the following attributes to reflect the id of the newly created datasource and the new data to be imported:
Attribute name | Value |
|---|---|
ID | supplyItemLong |
tableName | supplyItemLong |
dbImportFileName | supplyItemLargeLong.data.xml |
(Small side note: although the sample holds the absolute path for dbImportFileName, it is possible when importing the DataSource the import tool won't see the test data, unless it has been correctly specified in the table)
Creating the database table and importing test data
We are now going to create a database table for this newly declared DataSource and import some test data into it. For this we will use the Admin Console. To start the Admin Console, launch the application and then navigate to http://127.0.0.1:8888/builtinds/tools/adminConsole.jsp. This will open the admin console in a new web page.
In the newly opened page, select the 'Import DataSources' tab and once visible, select the newly created 'supplyItemLong' DataSource. Please make sure you check that the 'Test Data' column is set to 'yes' before doing this. If it is set to 'No', then please check the file names you specified in the previous steps. Once selected, press the 'Import' button at the bottom of the page. (Leave both checkboxes checked to create test data and generate the table).
If successful, you will be notified by a popup window that the DataSource has been imported.
You can double-check if the import worked correctly by selecting the 'Database Configuration' tab, then select your database name and click the 'Browse' button. In the window that is then displayed, select your database and in the left bottom grid you should see the SUPPLYITEMLONG table. By clicking on it, you should see the imported test data in the grid on the right.
Modifying the sample for detecting concurrent editing
Firstly, we need to make the code use the newly defined DataSource. For this locate the BuiltinDS.html file in the war folder and open it for editing, then navigate to the Script tag that defines the Datasources. This is always prefixed with "DataSourceLoader?datasource=":
| Code Block |
|---|
<script src="builtinds/sc/DataSourceLoader?dataSource=supplyItem,animals,employees"></script>
|
and change it to also load our new DataSource:
| Code Block |
|---|
<script src="builtinds/sc/DataSourceLoader?dataSource=supplyItem,supplyItemLong,animals,employees"></script>
|
Next, we have to include the new DataSource in the user interface, to allow users to interact with it. For this, edit the BuiltInDS.java file in the com.smartgwt.sample.client package and locate the following code sequence, which sets the records for the ListGrid showing the available DataSources:
| Code Block |
|---|
grid.setData(new ListGridRecord[]{
    new DSRecord("Animals", "animals"),
    new DSRecord("Office Supplies", "supplyItem"),
    new DSRecord("Employees", "employees")}
); |
and change it add an additional line as shown below:
| Code Block |
|---|
grid.setData(new ListGridRecord[]{
    new DSRecord("Animals", "animals"),
    new DSRecord("Long Running Edit", "supplyItemLong"),
    new DSRecord("Office Supplies", "supplyItem"),
    new DSRecord("Employees", "employees")}
); |
Rebuild the application and start it. You should now have a new DataSource called Long Running Edit which can be selected. When selected, the data will appear in the grid. It will be the same data as you would expect for the Office Supplies DataSource.
Now that we have the data, we can now look at detecting concurrent changes. For this we will need to use some of the advanced features of DSRequest: On each update, DSRequest holds both the changing data and all of the old data that was originally fetched before any changes took place. We will set these old values as a criteria for updating the row itself. If one of the values in the record doesn't match the values we received as old data, then the update will affect no records. After executing the update, we will then check how many records were affected, and if none were affected, then the record we were editing has already been changed. If that is the case, we need to re-fetch the existing record from the database re-display it in the UI, together with an arbitrary error code (-74), which will trigger the UI to handle the concurrecy issues.
So, first let's subclass (extend) SQLDataSource by creating LongDataSource in the com.smartgwt.sample.server package:
| Code Block |
|---|
import com.isomorphic.datasource.DSRequest; import com.isomorphic.datasource.DSResponse; import com.isomorphic.sql.SQLDataSource; import com.isomorphic.util.ISCDate; public public class LongDataSource extends SQLDataSource { private final static int MILLISECONDS_IN_DAY = 1000*60*60*24; private static final long serialVersionUID = 1L; private static Logger logger = Logger.getLogger(LongDataSource.class.getName ()); public DSResponse execute(DSRequest request) throws Exception { if (request.getOperationType().equals("update")) { // get the entire list of fields in this// DataSource List fields = request.getDataSource().getFieldNames(); // create a DSRequest to fetch the record we have to update and execute it DSRequest first = new DSRequest(); first.setDataSource(request.getDataSource()); first.setCriteria(request.getCriteria()); first.setOperationType("fetch"); DSResponse record = first.execute(); // check if there was any change in database while the user was editing the data // for each key we have to check if is defined in both nw and old and also if their // value is same. Map old = request.getOldValues(); Map nw = record.getRecord(); Iterator it = fields.iterator(); while( it.hasNext()) { String key = (String)it.next(); if (!compareRecordValues(old.get(key), nw.get(key))) { logger.info("Difference key="+key+" old="+old.get(key)+" new="+nw.get(key)); // Difference was found. // return the latest record, so the client side can display it to the user record.setStatus(-74); return record; } } } // if no change was found or the operation is not update, execute the standard code return super.execute(request); } /** * Compare two record values to check if they're same or not. Comparing them is not easy since both * values can be different type representing the same thing, for example Integer and String with same value * or Boolean and String, or ISCDate and Date, or Date and String and so on, so conversions are required * in order to be able to compare them * * @param v1 first value to be checked * @param v2 second value to be checked * * @return true if the two values match, false otherwise */ private boolean compareRecordValues(Object v1, Object v2) { // if both are null, they're equal if (v1 == null && v2 == null) { return true; } String c1 = "null"; String c2 = "nul"; if (v1 != null) { c1 = v1.getClass().getName(); } if (v2 != null) { c2 = v2.getClass().getName(); } logger.info("Comparing "+v1+" type of "+c1+" with "+v2+" type of "+c2); // if one of them is null and the other isn't, then they're not equal if ((v1 != null && v2==null ) || (v1 == null && v2 != null)) { return false; } // if both of them have the same class, compare them with equals() if (v1.getClass() == v2.getClass()) { logger.info("Both values have same class, comparing with equals()"); return v1.equals(v2); } // if one of items is ISCDate, convert both of them to ISCDate if (v1 instanceof ISCDate|| v2 instanceof ISCDate) { ISCDate d1 = null; ISCDate d2 = null; logger.info("Converting both of them to ISCDate before compare"); // v1 is ISCDate, convert v2 if (v1 instanceof ISCDate) { d1 = (ISCDate)v1; if ( v2 instanceof Date) { d2 = new ISCDate(((Date)v2).getTime()); } else { // not date, might be string or something else? d2 = new ISCDate(new Date(v2.toString()).getTime()); } } else { // v2 is ISCDate, convert v1 d2 = (ISCDate)v2; if ( v1 instanceof Date) { d1 = new ISCDate(((Date)v1).getTime()); } else { // not date, might be string or something else? d1 = new ISCDate(new Date(v1.toString()).getTime()); } } logger.info("d1="+d1.toString()+" d2="+d2.toString()); if (Math.abs(d1.getTime()-d2.getTime()) < MILLISECONDS_IN_DAY) { return true; } return false; } /* additional comparing removed to keep the code section small. They can be found in the attached archive */ // if no one of previous conditions were true, probably the fields don't match return false; } } |
This being done, we'll need a way to make our client side DataSource to use this subclassed DataSource. We can accomplish this by adding
| Code Block |
|---|
serverConstructor="com.smartgwt.sample.server.LongDataSource"
|
to the supplyItemLong.ds.xml DataSource attributes, making it look like this:
| Code Block | ||
|---|---|---|
| ||
<DataSource
    ID="supplyItemLong"
    serverType="sql"
    tableName="supplyItemLong"
    titleField="itemName"
    testFileName="supplyItem.data.xml"
    dbImportFileName="supplyItemLarge.data.xml"
    serverConstructor="com.smartgwt.sample.server.LongDataSource"
>
    <fields>
        <field name="itemID"      type="sequence" hidden="true"       primaryKey="true"/>
        ...
|
At this point, server side is set up and the client side should use the newly created LongDataSource class. If concurrent save occurs, it is detected and an error popup is displayed on the client side (you can check this by opening two browser tabs, start editing a line in the grid, then in the second tab edit the same record, save it and then go back to first tab and try to save this also. You should be notified that error code -74 occurred on server side).
On the client side however, there is some more work to be done. We need to catch the error returned by the server and make use of the latest data returned by the server. How this can be done depends on the component. However once we got called in the error handler and if it is for our arbitrary error code then we handle it by displaying a popup window to user with the database values and his values and allowing him to overwrite database values, continue editing or abort his changes. How the 'overwrite values' part works, also depends on component, but let's do it step by step.
Since the same window will be also used for the dynamic form, we will make it as a separate component, called ConcurrentConflictDialog. It will use the two records passed at construction time (server values and edited values) to inform the user about the values in the database and about the values edited and by a callback which is also passed as parameter, can call a handler to perform an action based on user's choice.It's omitted from this article however you can take a look into it by following these links: ConcurrentConflictDialog.java ConcurrentConflictDialogCallback.java or by checking them in the attached document.
Let's see how can we use this window for our grid and our form.
Changing ListGrid to detect concurrent save
For detecting the error code sent back by the server, we will attach the edit failed handler to the ListGrid in the BuiltInDS.java:
| Code Block |
|---|
// add an error handler to handle edit failed error
        boundList.addEditFailedHandler(new EditFailedHandler() {

			@Override
			public void onEditFailed(final EditFailedEvent event) {

				if (event.getDsResponse().getStatus() == -74)
				{
					// get some data we're going to use
					final int rowNum = event.getRowNum();
					final Record serverValues = event.getDsResponse().getData()[0];
					final Record editedValues = boundList.getEditedRecord(rowNum);
					final String[] fields = boundList.getDataSource().getFieldNames();

					final ListGridRecord oldValues = boundList.getRecord(rowNum);

					// create and display a conflict dialog to allow user see database record, his changed
					// record and choose how to resolve the conflict
					final ConcurrentConflictDialog dlg = new ConcurrentConflictDialog(serverValues, editedValues, fields, new ConcurrentConflictDialogCallback() {

						/**
						 * This will be called when user choose a option on the conflict dialog
						 */
						@Override
						public void dialogClosed(UserAction userAction) {

							if (userAction == UserAction.KEEP_EDITING)
							{
								// if user wants to continue editing, start editing on the list record
								boundList.startEditing(rowNum, 0, true);
							}
							else if (userAction == UserAction.DISCARD_CHANGES)
							{
								// if user wants to discard all changes, then we discard changes
								// on the row then cancel editing
								boundList.discardAllEdits(new int[]{rowNum},false);
								boundList.cancelEditing();
							}
							else if (userAction == UserAction.SAVE_ANYWAY)
							{
								// user wants to overwrite the database values
								// first set the old values to the values we're received from the server
								for(int i=0;i<fields.length;i++)
								{
									oldValues.setAttribute(fields[i],
										serverValues.getAttribute(fields[i]));
								}

								// perform save once more, this time the server side should not detect
								// any change as old values will match the database record (unless of
								// course somebody changed them yet again meanwhile)
								boundList.saveAllEdits(null, new int[]{rowNum});
							}
						}
					});

					dlg.show();
				}
			}
}); |
Code is straight forward. We get the server values and the edited values, then we'll create the conflict dialog passing him also a callback. In this callback, depending on the user's action we perform the intended operations:
- If user opts for continuing the edit process, then he will be returned to editing the row.
- If opts for discarding changes, all changes on the given row will be discarded and the editing process will be cancelled.
- Lastly, if user opts to overwrite the new data with his data, then we iterate over the edited fields and set them as attributes in the ListGrid record being edited, which will have as effect setting them as old values on next save. After this we will save again the row we're editing. This time - assuming no one changed the record meanwhile - because of the previous attribute setting, the old values will match the ones in the database, meaning no concurrent edit will be detected, so save will be successfully performed. However if meanwhile someone edits once more the record, then the received old values won't match the yet once again changed database record, so the entire cycle is restarted by returning the new database record to the user which again is notified about the concurrent editing issue and the new database values.
Changing DynamicForm to detect concurrent save
Changing DynamicForm to intercept the response code from the server requires a bit more work, but not that much. First we need to tell the form to not suppress the validation errors. For this we'll add:
| Code Block |
|---|
boundForm.setSuppressValidationErrorCallback(false); |
to BuiltInDS.java, right after boundForm is created. Next, we will create a method which will take care of saving the form itself:
| Code Block |
|---|
/**
     * Helper method to save the bound form
     *
     * @param oldValues the old values of the fields. If this is specified, before the
     * save request is made, form field old values will be set to these values. This is used
     * when user choose to overwrite the database values with his own, case in which the
     * database values have to become old values in order to perform a successful save
     * (otherwise save will fail as current old values will be different than the ones in the
     * database record).
     */
    private void saveForm(Record oldValues)
    {
    	// this is required in order to be able to handle errors on server side
        com.smartgwt.client.data.DSRequest req = new com.smartgwt.client.data.DSRequest();
    	req.setWillHandleError(true);

    	// if we're saved with old value, then set them up in the request
    	if (oldValues != null)
    	{
    		req.setOldValues(oldValues);
    	}

    	// save form data
    	boundForm.saveData(new DSCallback(){

			@Override
			public void execute(DSResponse response, Object rawData,
					com.smartgwt.client.data.DSRequest request)
			{
				// check if we have a concurrency issue
				if (response.getStatus() == -74)
				{
			    	// set up some data we're going to use later in the dialog
			    	final Record editedValues = boundForm.getValuesAsRecord();
					final String[] fields = boundList.getDataSource().getFieldNames();
					final Record serverValues = response.getData()[0];

					// create a conflict dialog and display it to the user
					final ConcurrentConflictDialog dlg = new ConcurrentConflictDialog(serverValues, editedValues, fields, new ConcurrentConflictDialogCallback() {

						/**
						 * This will be called when user choose a option on the conflict dialog
						 */
						@Override
						public void dialogClosed(UserAction userAction) {

							if (userAction == UserAction.KEEP_EDITING)
							{
								// no action needs to be performed if user wants to keep editing
								return;
							}
							else if (userAction == UserAction.DISCARD_CHANGES)
							{
								// if user wants to discard changes, we cancel editing and
								// clear form values
								boundForm.cancelEditing();
								boundForm.clearValues();
							}
							else if (userAction == UserAction.SAVE_ANYWAY)
							{
								// User wants to overwrite the database values.
								// save the form once more, with the server sent values as old values
								saveForm(serverValues);
							}
						}
					});

					dlg.show();
				}

				// if operation was successful, then clear form values and disable save button
				if (response.getStatus() == DSResponse.STATUS_SUCCESS)
				{
                                   boundForm.clearValues();
                                   saveBtn.disable();
                                }
			}

    	}, req);
} |
The code follows the same route as the error handler attached to the ListGrid, however first we need to make sure our handler will be called in case of error. For this we create a DSRequest and configure it accordingly. As an additional difference, if there are old values to be set (previously the user opted to overwrite the database values) we will have to set them into this newly created DSRequest in order to make them available on the server side - as opposed to the ListGrid, where we made them available by setting attributes.
Also as a note to clarify the flow, when user opts for overwriting the database values, we just simply call the save function once more, passing the values sent us by the server to be set as old values.
If save is performed successfully, we will clear the form values and disable the save button.
This being said, all remaining to be done is to refactor the save button action handler to call our function, so replace the code with this:
| Code Block |
|---|
saveBtn.addClickHandler(new ClickHandler(if it is not update, then we'll simply execute the request and return the result if (!request.getOperationType().equals("update")) { return super.execute(request); } else { String pkName = request.getDataSource().getPrimaryKey(); // security check, oldValues should contain primary key with same value as the one in criteria if (!makeLong(request.getCriteria().get(pkName)).equals(makeLong(request.getOldValues().get(pkName)))) { logger.info("Primary key value in old values is not same as in the update values: "+request.getValues().get(pkName).toString()+"!="+ request.getOldValues().get(pkName).toString()); DSResponse error = new DSResponse(); error.setStatus(-1); return error; } // save initial criteria for later Map updateCriteria = request.getCriteria(); // set old record we know about as criteria for update and execute the update request.setCriteria(request.getOldValues()); DSResponse response = super.execute(request); // if no rows were affected, it means someone else changed the row, so fetch it and // send it back to the front-end. This way the front-end will be able to display a dialog // containing the current record in the database. if (response.getAffectedRows() == 0) { // create a DSRequest to fetch the record we have to update and execute it DSRequest dbRow = new DSRequest(); dbRow.setDataSource(request.getDataSource()); dbRow.setRPCManager(request.getRPCManager()); // set back the initial criteria we had dbRow.setCriteria(updateCriteria); dbRow.setOperationType("fetch"); DSResponse dbRecord = dbRow.execute(); // set the error status to trigger the client-side handling dbRecord.setStatus(-74); return dbRecord; } // if row was affected, update was successful, so return the response to the user. return response; } } |
You can notice we set the RPCManager in the fetch request to the RPCManager of the initial update request, in order to make sure they both run in same transaction. We also made sure both primary keys are Long in the security check by converting them if the case, using a helper function makeLong():
| Code Block |
|---|
public Long makeLong(Object obj)
{
    if (obj == null)
    {
        return null;
    }

    if(obj instanceof Long)
    {
        return (Long)obj;
    }

    if (obj instanceof Integer)
    {
        Integer tmp = (Integer)obj;

        return new Long(tmp.longValue());
    }

    if (obj instanceof Number)
    {
        Number tmp = (Number)obj;

        return new Long(tmp.longValue());
    }

    if (obj instanceof String)
    {
        String tmp = (String) obj;

        return new Long(tmp);
	}

    logger.warning("Primary Key type is "+obj.getClass().getName()+", using toString() to convert it to long.");

    return new Long(obj.toString());
}
|
We then need a way to make our client side DataSource use this subclassed DataSource. This is achieved by adding
| Code Block |
|---|
serverConstructor="com.smartgwt.sample.server.LongDataSource"
|
to the supplyItemLong.ds.xml DataSource attributes. It will now look like this:
| Code Block | ||
|---|---|---|
| ||
<DataSource
    ID="supplyItemLong"
    serverType="sql"
    tableName="supplyItemLong"
    titleField="itemName"
    dbImportFileName="supplyItemLarge.data.xml"
    serverConstructor="com.smartgwt.sample.server.LongDataSource"
>
    <fields>
        <field name="itemID"      type="sequence" hidden="true"       primaryKey="true"/>
        ...
|
Also, we need to update the definition of nextShipment field in the DataSource, since in it's current state it won't allow empty values. To do this, we need to add useTextField="true" to it's definition, like this:
| Code Block |
|---|
<field name="nextShipment" type="date" title="Next Shipment" required="false" useTextField="true"/>
|
At this point, the server side is set up and the client side should use the newly created LongDataSource class. If a concurrent save occurs, it will be detected and an error popup will be displayed on the client side (you can check this by opening two browser tabs, start editing a line in the grid, then in the second tab edit the same record, save it and then go back to first tab and try to save. You should be notified that error code -74 occurred).
We now need to enhance the client side code to catch the error returned by the server and make use of the latest data that has been returned. How this can be done depends on the actual component but if it is for our arbitrary error code, then we can handle it by displaying a popup window to the user with the database values and his locally changed values. We can then allow the user to overwrite the database values, continue editing or abort their changes. How the 'overwrite values' works, also depends on the component.
As we will use the same window for the DynamicForm, we will create a separate component, called ConcurrentConflictDialog. It will use the two records passed at construction time (server values and edited values) to inform the user about the values in the database and the locally edited user values.A callback is also passed as a parameter and can call a handler to perform an action based on the user's choice.This has been omitted from this article but you can see this in action by following these links: ConcurrentConflictDialog.java ConcurrentConflictDialogCallback.java or by reviewing them in the attached document.
Let's see how can we use this window for our grid and our form.
Changing ListGrid to detect concurrent save
For detecting the error code sent back by the server,use the EditFailedHandler on the ListGrid in the BuiltInDS.java:
| Code Block |
|---|
// add an error handler to handle edit failed error
boundList.addEditFailedHandler(new EditFailedHandler() {

    @Override
    public void onEditFailed(final EditFailedEvent event) {

        if (event.getDsResponse().getStatus() == -74)
        {
            // get some data we're going to use
            final int rowNum = event.getRowNum();
            final Record serverValues = event.getDsResponse().getData()[0];
            final Record editedValues = boundList.getEditedRecord(rowNum);
            final String[] fields = boundList.getDataSource().getFieldNames();

            final ListGridRecord oldValues = boundList.getRecord(rowNum);

            // create and display a conflict dialog to allow user see database record, his changed
            // record and choose how to resolve the conflict
            final ConcurrentConflictDialog dlg = new ConcurrentConflictDialog(serverValues, editedValues, fields, new ConcurrentConflictDialogCallback() {

                /**
                 * This will be called when user choose a option on the conflict dialog
                 */
                @Override
                public void dialogClosed(UserAction userAction) {

                    if (userAction == UserAction.KEEP_EDITING)
                    {
                        // if user wants to continue editing, start editing on the list record
                        boundList.startEditing(rowNum, 0, true);
                    }
                    else if (userAction == UserAction.DISCARD_CHANGES)
                    {
                        // if user wants to discard all changes, then we discard changes
                        // on the row then cancel editing
                        boundList.discardAllEdits(new int[]{rowNum},false);
                        boundList.cancelEditing();
                    }
                    else if (userAction == UserAction.SAVE_ANYWAY)
                    {
                        // user wants to overwrite the database values
                        // first set the old values to the values we're received from the server
                        for(int i=0;i<fields.length;i++)
                        {
                            oldValues.setAttribute(fields[i],
                                serverValues.getAttribute(fields[i]));
                        }

                        // perform save once more, this time the server side should not detect
                        // any change as old values will match the database record (unless of
                        // course somebody changed them yet again meanwhile)
                        boundList.saveAllEdits(null, new int[]{rowNum});
                    }
                }
            });

            dlg.show();
        }
    }
});
|
The EditFailedHandler allows us to get the server values and the edited values, thereby allowing us to create the conflict dialogue, which is also passed a callback. Using this callback lets us track the user requested action, so we can perform the necessary next operation:
- If the user chooses to continue the edit process, then they will be returned to editing the row.
- If the user chooses to discard their changes, all changes on the given row will be discarded and the editing process will be cancelled.
- Lastly, if the user chooses to overwrite the new data with their data, then we iterate over the edited fields and set them as attributes in the ListGrid record being edited, which has the same effect as setting them as old values on the next save. After this we issue the save again against the edited row. This time,assuming no one changed the record in the interim, and as we have set the attributes, the old values will match the existing values in the database, meaning no concurrent edit will be detected, so the save will be successful. However, if in the meantime, someone else edits this record again, then the received old values won't match the changed database record and the entire cycle will iterate(i.e. the newly changed database record will be returned to to the user highlighting the concurrent editing issue and the new database values).
Changing DynamicForm to detect concurrent save
Changing a DynamicForm to intercept the response code from the server is a little more complicated,. Firstly, we need to tell the form to not suppress validation errors.The code below shows how to do this:
| Code Block |
|---|
boundForm.setSuppressValidationErrorCallback(false); |
Next, we need to create a method that will save the form:
| Code Block |
|---|
/**
 * Helper method to save the bound form
 *
 * @param oldValues the old values of the fields. If this is specified, before the
 * save request is made, form field old values will be set to these values. This is used
 * when user choose to overwrite the database values with his own, case in which the
 * database values have to become old values in order to perform a successful save
 * (otherwise save will fail as current old values will be different than the ones in the
 * database record).
 */
private void saveForm(Record oldValues)
{
    // this is required in order to be able to handle errors on server side
    com.smartgwt.client.data.DSRequest req = new com.smartgwt.client.data.DSRequest();
    req.setWillHandleError(true);

    // if we're saved with old value, then set them up in the request
    if (oldValues != null)
    {
        req.setOldValues(oldValues);
	}

    // save form data
    boundForm.saveData(new DSCallback(){

        @Override
        public void execute(DSResponse response, Object rawData,
            com.smartgwt.client.data.DSRequest request)
        {
            // check if we have a concurrency issue
            if (response.getStatus() == -74)
            {
                // set up some data we're going to use later in the dialog
                final Record editedValues = boundForm.getValuesAsRecord();
                final String[] fields = boundList.getDataSource().getFieldNames();
                final Record serverValues = response.getData()[0];

                // create a conflict dialog and display it to the user
                final ConcurrentConflictDialog dlg = new ConcurrentConflictDialog(serverValues, editedValues, fields, new ConcurrentConflictDialogCallback() {

                    /**
                     * This will be called when user choose a option on the conflict dialog
                     */
                    @Override
                    public void dialogClosed(UserAction userAction) {

                        if (userAction == UserAction.KEEP_EDITING)
                        {
                            // no action needs to be performed if user wants to keep editing
                            return;
                        }
                        else if (userAction == UserAction.DISCARD_CHANGES)
                        {
                            // if user wants to discard changes, we cancel editing and
                            // clear form values
                            boundForm.cancelEditing();
                            boundForm.clearValues();
                        }
                        else if (userAction == UserAction.SAVE_ANYWAY)
                        {
                            // User wants to overwrite the database values.
                            // save the form once more, with the server sent values as old values
                            saveForm(serverValues);
                        }
                    }
                });

                dlg.show();
            }

            // if operation was successful, then clear form values and disable save button
            if (response.getStatus() == DSResponse.STATUS_SUCCESS)
            {
                boundForm.clearValues();
                saveBtn.disable();
            }
        }
    }, req);
} |
The code follows the same approach as the error handler on the ListGrid. However, we need to make sure the handler will be called when an error is found. For this, we create a DSRequest and configure it accordingly. As an extra difference, if there are old values to be set (previously the user chose to overwrite the database values) we will have to set them into this newly created DSRequest to make them available on the server. Note: With ListGrid, they were made available by setting them as attributes.
Also, when user opts to overwrite the database values, we simply call the save function once more, passing the values sent by the server and set as the old values.
If the save is performed successfully, we clear the form values and disable the save button.
Then, all that is left to be done, is to refactor the save button ClickHandler to call our function, so replace the code with this:
| Code Block |
|---|
saveBtn.addClickHandler(new ClickHandler() {
    public void onClick(final ClickEvent event) {
        saveForm(null);
    }
}); |
We pass null as parameter, as initially we don't have any old values from the server.
Finally, since we changed the nextShipment field definition in the DataSource, when the edited record is changed, we need to set the nextShipment field value to the one in the record to be edited, like this:
| Code Block |
|---|
boundList.addRecordClickHandler(new RecordClickHandler() { public void onRecordClick(RecordClickEvent event) { Record record = event.getRecord(); public void onClick(final ClickEvent event) { saveForm(null); boundForm.editRecord(record); boundForm.setValue("nextShipment", record.getAttributeAsDate("nextShipment")); }saveBtn.enable(); }); |
...
boundViewer.viewSelectedData(boundList);
    }
});
|
Testing the functionality
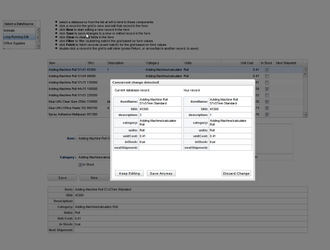
The functionality can be tested with two open windows. After selecting our Long Running Edit DataSource in both, start editing one row in one of the windows, but don't submit the form. Then go to the second page and change the same row you're editing in the first window and save the changes. Then go back to the first window and save the those changes there also. Concurrent change should be detected and you should get something like this:
Some notes:
...
- in LongDataSource, you have to override the execute() method. Overriding execute_udpdate() does not seem to work.
- Fields which are or will be set to null won't show up in the Record sometimes, so when you have to iterate over the record for setting old values for all fields, is best to retrieve the list of fields from the DataSource.
A eclipse An Eclipse project with all the required files can be downloaded from here.: builtinds-concurentChangesconcurrentChanges.zip. It You will require however still need to create the datasource DataSource and import the sample data as described in this document.