This example, shows us how to setup Tomcat JDBCRealm to use it within of our projects.This type of realm involves to register usernames, passwords and assigned roles inside a database and this information is used by authentication methods.
Next, we are going to explain step by step what we need to do.
For this example, we are using:
Web Server Tomcat 7.0.20. You can download the latest version here.
DataBase MySQL - 5.0.45-community-nt. You can download the latest version here.
1.- Set up JDBCRealm on Tomcat, locate the server.xml configuration file in <TOMCAT_HOME>/conf/, then, add the following lines where corresponds:
<Realm className="org.apache.catalina.realm.JDBCRealm" driverName="com.mysql.jdbc.Driver" connectionURL="jdbc:mysql://localhost/smartgwt?user=smart&password=smart" userTable="isg_users" userNameCol="user_name" userCredCol="user_passwd" userRoleTable="isg_users_roles" roleNameCol="role_name"/>
Note. You have to copy the jdbc library of MySql into <TOMCAT_HOME>/lib/.
2.- We have to create a new database and create the following tables:
create table `isg_roles` (
	`ROLE_NAME` varchar (60)
);
insert into `isg_roles` (`ROLE_NAME`) values('admin');
insert into `isg_roles` (`ROLE_NAME`) values('manager');
insert into `isg_roles` (`ROLE_NAME`) values('manager-gui');
insert into `isg_roles` (`ROLE_NAME`) values('manager-script');
insert into `isg_roles` (`ROLE_NAME`) values('manager-status');
insert into `isg_roles` (`ROLE_NAME`) values('tomcat');

create table `isg_users` (
	`USER_NAME` varchar (60),
	`USER_PASSWD` varchar (60)
);
insert into `isg_users` (`USER_NAME`, `USER_PASSWD`) values('tomcat','tomcat');
insert into `isg_users` (`USER_NAME`, `USER_PASSWD`) values('admin','admin');

create table `isg_users_roles` (
	`USER_NAME` varchar (60),
	`ROLE_NAME` varchar (60)
);
insert into `isg_users_roles` (`USER_NAME`, `ROLE_NAME`) values('admin','admin');
insert into `isg_users_roles` (`USER_NAME`, `ROLE_NAME`) values('admin','manager');
insert into `isg_users_roles` (`USER_NAME`, `ROLE_NAME`) values('admin','manager-gui');
insert into `isg_users_roles` (`USER_NAME`, `ROLE_NAME`) values('admin','manager-status');
insert into `isg_users_roles` (`USER_NAME`, `ROLE_NAME`) values('tomcat','tomcat');
3.- Create a user with all grants on the created tables of the new database, in this example the user is "smart" and the database name is "smartgwt"
4.- Set up the web.xml file of the example to use the authentication method Form based:
    <login-config>
		<auth-method>FORM</auth-method>
		<realm-name>User Auth</realm-name>
			<form-login-config>
				<form-login-page>/login.html</form-login-page>
				<form-error-page>/error.html</form-error-page>
			</form-login-config>
    </login-config>
    <security-role>
		<role-name>*</role-name>
    </security-role>

   <security-constraint>
	  <web-resource-collection>
		  <web-resource-name>Sample Application</web-resource-name>
		  <url-pattern>*.html</url-pattern>
		  <url-pattern>/securitytomcat/sc/IDACall/*</url-pattern>
		  <http-method>POST</http-method>
		  <http-method>GET</http-method>
	  </web-resource-collection>

	  <auth-constraint>
		<role-name>*</role-name>
	  </auth-constraint>
    </security-constraint>
Here there is an example of a replacement login page with some attractive styling.
Until now, all the steps were to setup JBDCRealm on Tomcat.
As from the next step, we are going to explain some functionalities of this example:
5.- We create an interface for editing user and role assignments, this will be only accessible to a user with role "admin", in other case, the system will throws an error.
We are going to need 3 .ds.xml files:
<DataSource
    ID="users"
    serverConstructor="com.smartgwt.sample.server.UsersDataSource"
>
    <fields>
        <field name="userName"        type="text"  title="User Name"      primaryKey="true" />
    </fields>
</DataSource>
<DataSource
    ID="roles"
    serverConstructor="com.smartgwt.sample.server.RolesDataSource"
>
    <fields>
        <field name="roleName"  	type="text"      title="Role Name" primaryKey="true"/>
    </fields>

</DataSource>
<DataSource
    ID="usersRoles"
    serverConstructor="com.smartgwt.sample.server.UsersRolesDataSource"
>
    <fields>
        <field name="userName"  	type="text"      title="User Name" primaryKey="true"/>
        <field name="roleName"  	type="text"      title="Role Name" primaryKey="true"/>
    </fields>

    <operationBindings>
        <operationBinding operationType="add"
        requiresRole="admin" requiresAuthentication="true"/>

        <operationBinding operationType="remove"
        requiresRole="admin" requiresAuthentication="true"/>
    </operationBindings>
</DataSource>
After the user is authenticated, we are going to save the assigned roles of the user, this we make with a new servlet, which is named ServletLogin and the relevant code is the following:
Principal principal = request.getUserPrincipal();
GenericPrincipal genericPrincipal = (GenericPrincipal) principal;
final String[] roles = genericPrincipal.getRoles();
String userRoles = "";
for (int i = 0; i < roles.length; i++) {
    userRoles = userRoles + roles[i]+",";
}
PrintWriter writer = response.getWriter();
writer.append(userRoles);
In the web.xml file, add the following lines:
    <servlet>
	<servlet-name>ServletLogin</servlet-name>
	<servlet-class>com.smartgwt.sample.server.ServletLogin</servlet-class>
    </servlet>
    <servlet-mapping>
            <servlet-name>ServletLogin</servlet-name>
	 <url-pattern>/ServletLogin</url-pattern>
    </servlet-mapping>
In the client-side, the relevant code is:
RPCRequest request = new RPCRequest();
request.setActionURL("ServletLogin");
RPCManager.sendRequest(request,new RPCCallback(){
public void execute(RPCResponse response, Object rawData, RPCRequest request) {
	        	 User.setRoles(rawData.toString());
       			 if (User.hasRole("admin")) {
	        		theTabs.addTab(tabRoles);
	        	 	theTabs.addTab(tabItems);
	        	 } else {
	        		 theTabs.addTab(tabItems);
	        	 }
	         }
	     });
So, if the authenticated user has the role admin, the user will have access to the interface for editing user and role assignments.
Additionally, we need another class in client-side, this is the User Class, and the relevant code is the following:
        private static String roles;
	public static void setRoles(String ro) {
		roles = ro;
	}

	public static boolean hasRole(String role) {
		if (roles.contains(role)) {
			return true;
		}
		return false;
	}
Last, we show you a screenshots of this example in action.
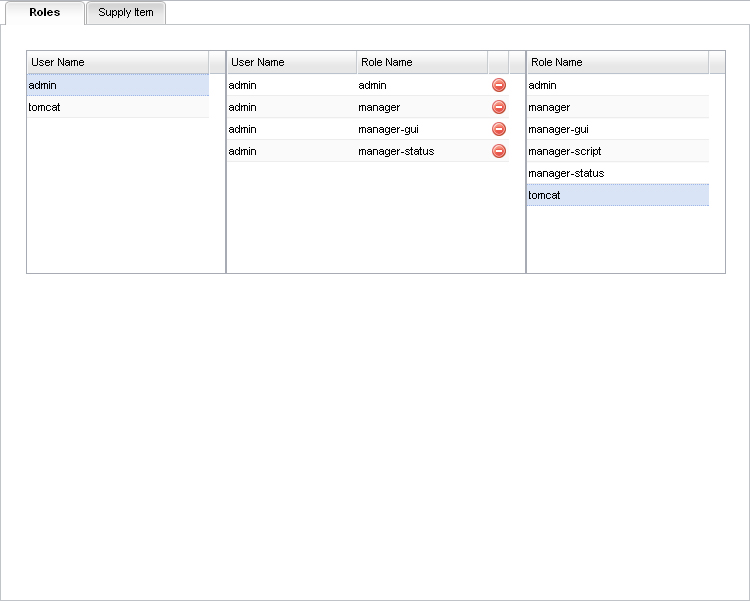
Picture 1.- Interface of edition for the user with admin role.
Picture 2.- Just to verify an error, in case the user can access to the interface of edition(this could be with another role, e.g. manager), but does not have the admin role (required for edition). 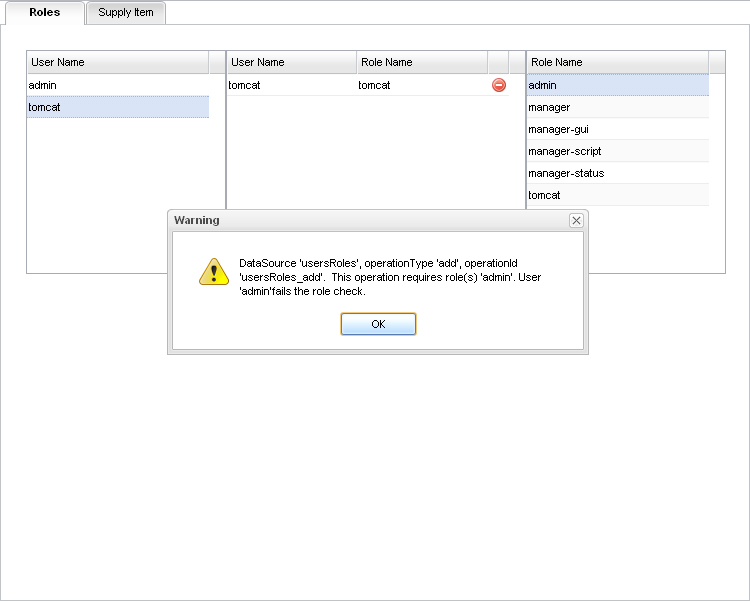
6.- Display the effects of the configuration: editRequiresRole="admin" and viewRequiresRole="admin" in the .ds.xml file.
For this example, we are going to need the supplyItem.ds.xml file:
<DataSource
    ID="supplyItem"
    recordXPath="/List/supplyItem"
    dataURL="ds/test_data/supplyItem.data.xml"
>
    <fields>
        <field name="itemID"      type="sequence" hidden="true"       primaryKey="true"/>
        <field name="itemName"    type="text"     title="Item"        length="128"       required="true"
        	   editRequiresRole="admin" />
        <field name="SKU"         type="text"     title="SKU"         length="10"        required="true"
               editRequiresRole="admin" />
        <field name="description" type="text"     title="Description" length="2000"
               viewRequiresRole="admin" />
        <field name="category"    type="text"     title="Category"    length="128"       required="true"
               editRequiresRole="admin"
               foreignKey="supplyCategory.categoryName"/>
        <field name="units"       type="enum"     title="Units"       length="5" editRequiresRole="admin">
            <valueMap>
                <value>Roll</value>
                <value>Ea</value>
                <value>Pkt</value>
                <value>Set</value>
                <value>Tube</value>
                <value>Pad</value>
                <value>Ream</value>
                <value>Tin</value>
                <value>Bag</value>
                <value>Ctn</value>
                <value>Box</value>
            </valueMap>
        </field>
        <field name="unitCost"    type="float"    title="Unit Cost"   required="true" editRequiresRole="Admin">
            <validators>
                <validator type="floatRange" min="0" errorMessage="Please enter a valid (positive) cost"/>
                <validator type="floatPrecision" precision="2" errorMessage="The maximum allowed precision is 2"/>
            </validators>
        </field>
        <field name="inStock"   type="boolean"  title="In Stock" viewRequiresRole="admin" />
        <field name="nextShipment"  type="date" title="Next Shipment" viewRequiresRole="admin" />
    </fields>
</DataSource>
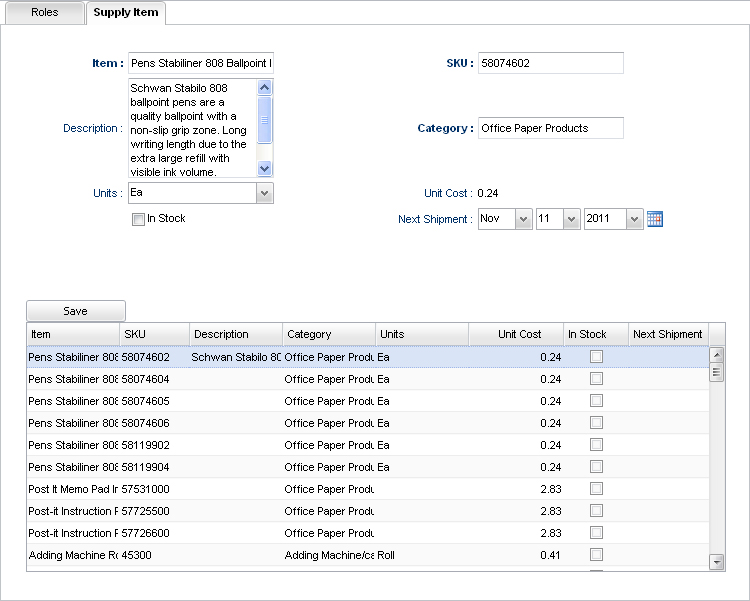
After the user is authenticated, we have some screenshots to see this example in action.
Picture 3. This is the interface for the user with the admin role.
Picture 4. This is the interface for the user without the admin role, here, the fields with editRequiresRole="admin" will be read-only, and the fields with viewRequiresRole="admin", will not be visible. 
Picture 5. This is the error in case that the user does not have the Admin role and wants to save data. 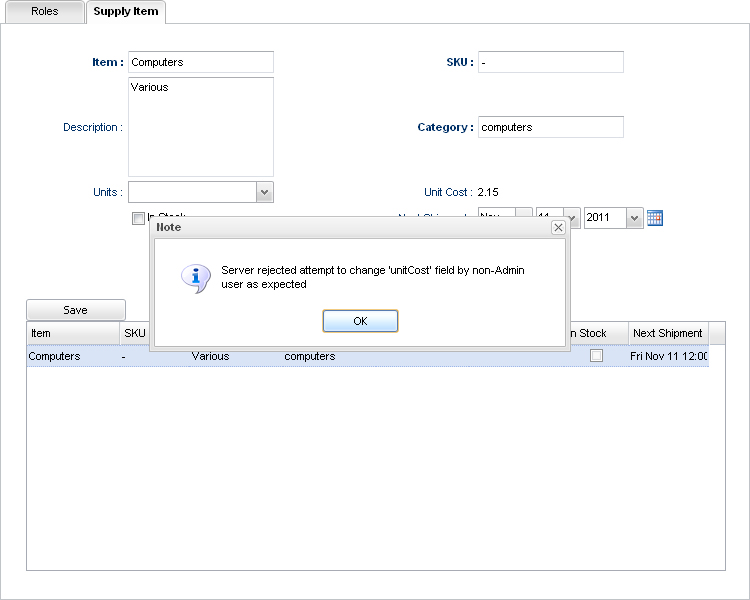
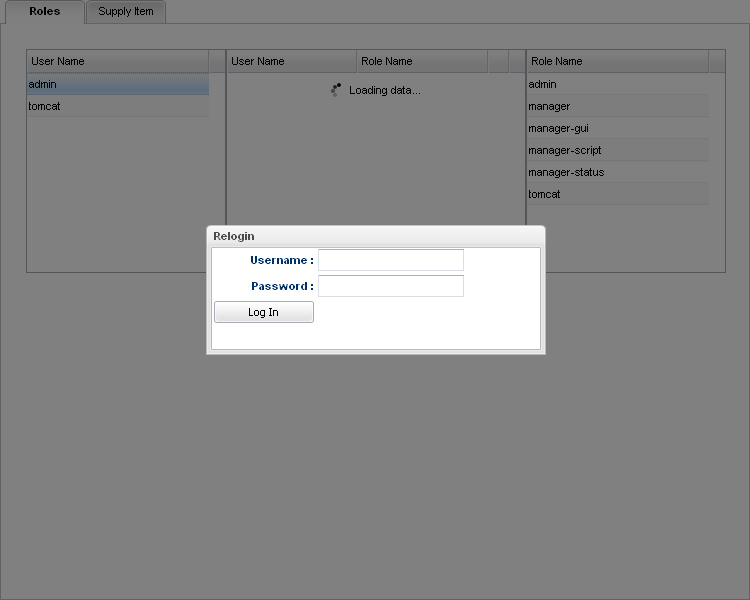
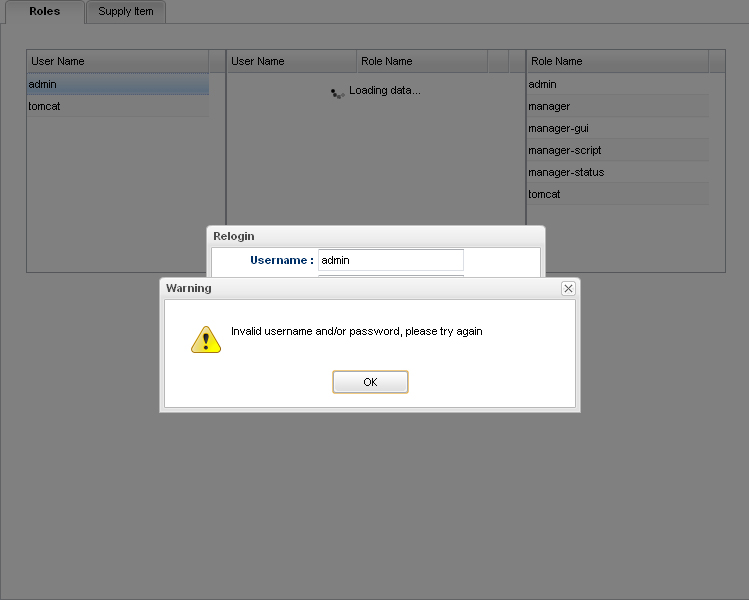
7.- Finally, we are going to show you how works the re-login mechanism, this occurs when the session of the user is invalidate, if the user wants to continue editing, will be forced to re-authenticate.
Picture 6. The window re-login.
Picture 7. In case of the username/password are incorrect.
The following code is required inside of your login page, to use the re-login mechanism.
<SCRIPT>//'"]]>>isc_loginRequired
//
// Embed this whole script block VERBATIM into your login page to enable
// SmartClient RPC relogin.

while (!window.isc && document.domain.indexOf(".") != -1) {
    try {

        if (parent.isc == null) {
            document.domain = document.domain.replace(/.*?\./, '');
            continue;
        }
        break;
    } catch (e) {
        document.domain = document.domain.replace(/.*?\./, '');
    }
}

var isc = top.isc ? top.isc : window.opener ? window.opener.isc : null;
if (isc) isc.RPCManager.delayCall("handleLoginRequired", [window]);
</SCRIPT>
While the user is being re-authenticate, the requested operation is put on hold, if the re-authentication is successful, the operation on hold, just continues.
More information about the re-login mechanism here.
You can download the source code of this example here.